本文是我在学习 Flutter 时的练手项目,现整理成入门教程,有需要的道友可以看看。由于是入门教程,文中内容不会很深入,对于已经学习 Flutter 一段时间的道友,略过即可。
实现过程
新建项目
生成的项目结构如下:
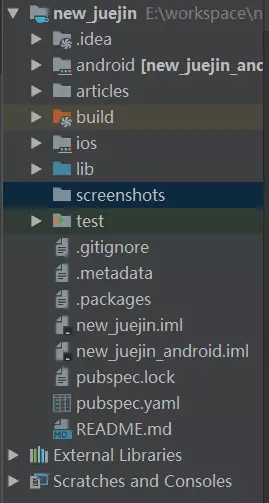
在此项目中,我们的业务代码都在 lib 下,包配置都在 pubspec.yaml 中。

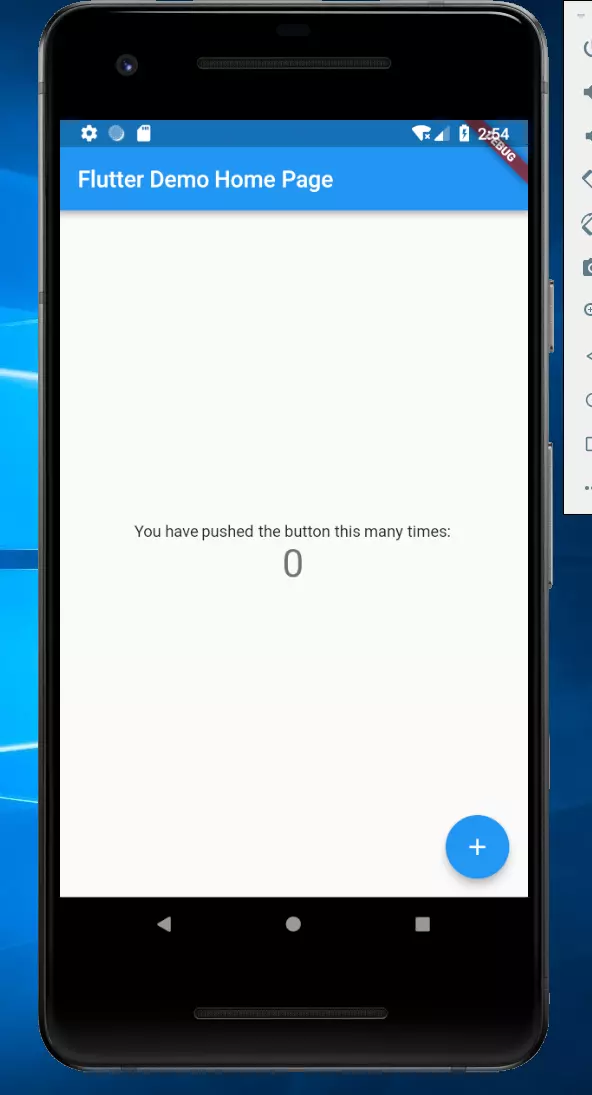
点击右上角的模拟器按钮,选择已经配置好的模拟器,再点击旁边的绿色三角形,稍等片刻,当你在模拟器中看到下面的效果,恭喜,项目跑起来了:
Flutter的安装和配置小伙伴们就自己完成吧,我使用的是 Windows 和 intellij,参照的是 ios 版掘金 app,小伙伴们后面看到模拟器不要笑啊,因为我买不起苹果啊,哈哈!
上图中的 screenshots 和 articles 文件夹是我写文章用的,小伙伴们不用看。
改造根组件
打开 lib 中的 main.dart 文件,会看到已经有一些代码,有注释,小伙伴们可以阅读一下(截图有点长,贴代码有点多,小伙伴们就自己看了)。删掉原有的代码,我们开始写自己的代码:
import 'package:flutter/material.dart';
void main() => runApp(new MyApp());
class MyApp extends StatelessWidget {
Widget build(BuildContext context) {
return new MaterialApp(
theme: new ThemeData(
highlightColor: Colors.transparent, //将点击高亮色设为透明
splashColor: Colors.transparent, //将喷溅颜色设为透明
bottomAppBarColor: new Color.fromRGBO(244, 245, 245, 1.0), //设置底部导航的背景色
scaffoldBackgroundColor: new Color.fromRGBO(244, 245, 245, 1.0), //设置页面背景颜色
primaryIconTheme: new IconThemeData(color: Colors.blue), //主要icon样式,如头部返回icon按钮
indicatorColor: Colors.blue, //设置tab指示器颜色
iconTheme: new IconThemeData(size: 18.0), //设置icon样式
primaryTextTheme: new TextTheme( //设置文本样式
title: new TextStyle(color: Colors.black, fontSize: 16.0))),
);
}
}
小伙伴们会发现和之前的代码有些不一样,不用惊讶,写法可以有很多种,以后就明白了。你要是现在点底部的 Hot Reload 或者 Hot Restart 会发现啥也没有,当然啦,我们啥都还没写呢:
头部的 import 是引入我们需要用的包等东西,这里引入了 material.dart ,这是一个包含了大量 material 风格的组件的包。
Flutter中 的 Widget (组件)有两类, StatelessWidget 是无状态的, StatefulWidget 是有状态的,当你的页面会随着状态的改变发生变化时使用。两者中必有 build 方法,用于创建内容。
MaterialApp 是应用的根组件,这是实现了 material 风格的 WidgetsApp,后面所有的页面、组件都会在其中。
theme 中是对组件做一些全局配置。
WARNING
小伙伴们一定要多看文档哈,虽然文档很多,但要是你不看,你可能会懵逼的,尤其是做前端开发的同志,dart 是新语言,语法这些是必须要学习的,我不可能在文中逐行解释,切记!
实现 App 界面结构
在 lib 文件夹下新建 pages 文件夹,用于存放我们的页面。然后再 pages 文件夹下新建 index.dart 、 home.dart 、 discovery.dart 、 hot.dart 、 book.dart 、 mine.dart ,对应底部的每个tab,这是我们项目中主要会用到的文件了。
.
└─ lib
   ├─ index.dart
   ├─ home.dart
   ├─ discovery.dart
   ├─ hot.dart
   ├─ book.dart
   └─ mine.dart
在 index.dart 文件中写入如下内容:
import 'package:flutter/cupertino.dart';
import 'package:flutter/material.dart';
import 'home.dart';
import 'hot.dart';
import 'discovery.dart';
import 'book.dart';
import 'mine.dart';
class IndexPage extends StatefulWidget {
createState() => new IndexPageState();
}
class IndexPageState extends State<IndexPage> {
// 定义底部导航列表
final List<BottomNavigationBarItem> bottomTabs = [
new BottomNavigationBarItem(
icon: new Icon(CupertinoIcons.home),
title: new Text('首页'),
),
new BottomNavigationBarItem(
icon: new Icon(CupertinoIcons.conversation_bubble),
title: new Text('沸点')),
new BottomNavigationBarItem(
icon: new Icon(CupertinoIcons.search), title: new Text('发现')),
new BottomNavigationBarItem(
icon: new Icon(CupertinoIcons.book), title: new Text('小册')),
new BottomNavigationBarItem(
icon: new Icon(CupertinoIcons.profile_circled), title: new Text('我'))
];
final List<Widget> tabBodies = [
new HomePage(),
new HotPage(),
new DiscoveryPage(),
new BookPage(),
new MinePage()
];
int currentIndex = 0; //当前索引
Widget currentPage; //当前页面
void initState() {
super.initState();
currentPage = tabBodies[currentIndex];
}
Widget build(BuildContext context) {
// TODO: implement build
return new Scaffold(
bottomNavigationBar: new BottomNavigationBar(
type: BottomNavigationBarType.fixed,
currentIndex: currentIndex,
items: bottomTabs,
onTap: (index) {
setState(() {
currentIndex = index;
currentPage = tabBodies[currentIndex];
});
}),
body: currentPage,
);
}
}
上面的代码创建了一个即底部有tab按钮的基本页面结构,用于切换不同页面。通过点击事件改变当前索引,来显示相应的页面。bottomTabs 可以封装一下,就留给小伙伴们自己弄了哈,当是练习。
顶部我们引入了一个 Cupertino.dart,这是 iOS 风格的组件,我们还用到了ios的图标,引入前我们需要到 pubspec.yaml 中配置一下,然后点击 Packages get:

因为我们的页面内容是会切换的,换句话说,状态会发生改变,所以这里使用 StatefulWidget。
final 关键字用于申明一个常量,List<BottomNavigationBarItem> 中的 List 用于申明一个数组,相当于 js 中的 Array,后面的 BottomNavigationBarItem 指的是元素的类型。
Scaffold 可能是用得最多的组件了,它对页面实现了一些结构划分,其余的属性部分,小伙伴们就自己看文档了,不难,记住就行。
接着我们在其余文件中写入下面的代码,只修改页面名字:
import 'package:flutter/material.dart';
import 'package:flutter/cupertino.dart';
class HotPage extends StatefulWidget {
HotPageState createState() => new HotPageState();
}
class HotPageState extends State<HotPage> {
Widget build(BuildContext context) {
// TODO: implement build
return new Center(child: new Text('沸点'),);
}
}
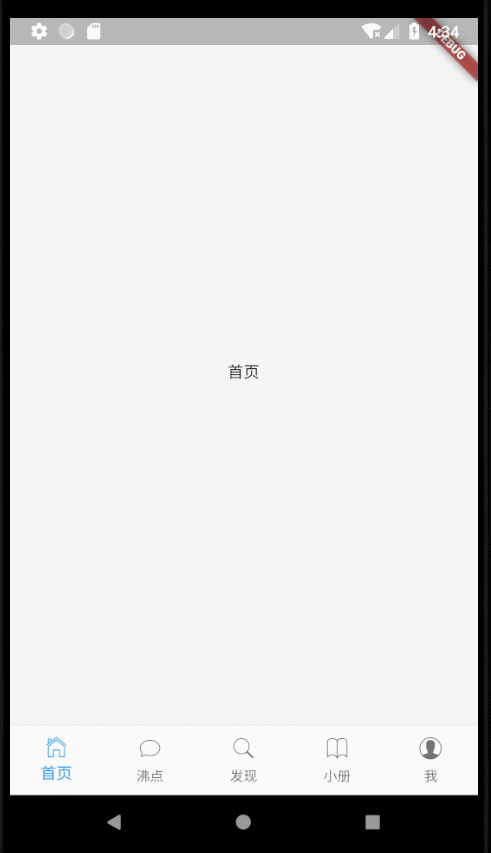
保存一下,如果你在模拟器上看到下面的内容,就成功了:
tabs 也可以用 iOS 风格的 CupertinoTabBar 实现,此组件的表现和 iOS 原生的一模一样,留给小伙伴们当练习。
首页实现
现在我们来实现首页,先在 lib 文件夹下新建一个 config 文件夹,并在其中创建 httpHeaders.dart 文件,写入下列代码:
const httpHeaders = {
  'Accept': '*/*',
  'Accept-Encoding': 'gzip, deflate, br',
  'Accept-Language': 'zh-CN,zh;q=0.9',
  'Connection': 'keep-alive',
  'Host': 'gold-tag-ms.juejin.im',
  'Origin': 'https://juejin.im',
  'Referer': 'https://juejin.im/timeline',
  'User-Agent':
      'Mozilla/5.0 (iPhone; CPU iPhone OS 11_0 like Mac OS X) AppleWebKit/604.1.38 (KHTML, like Gecko) Version/11.0 Mobile/15A372 Safari/604.1',
  'X-Juejin-Client': '1532136021731',
  'X-Juejin-Src': 'web',
  'X-Juejin-Token':
      'eyJhY2Nlc3NfdG9rZW4iOiJWUmJ2dDR1RFRzY1JUZXFPIiwicmVmcmVzaF90b2tlbiI6IjBqdXhYSzA3dW9mSTJWUEEiLCJ0b2tlbl90eXBlIjoibWFjIiwiZXhwaXJlX2luIjoyNTkyMDAwfQ==',
  'X-Juejin-Uid': '59120a711b69e6006865dd7b'
};
这是掘金的请求头信息,后面会用到,先定义在这里,需要注意的是其中的 X-Juejin-Client 会变化,如果小伙伴们在看文章的时候发现值变了,改一下就行(好像不改也还是能用)。
打开 home.dart ,在顶部写入下列代码:
import 'package:flutter/material.dart';
import 'package:flutter/cupertino.dart';
import 'dart:convert';
import 'dart:async';
import 'package:http/http.dart' as http;
import '../config/httpHeaders.dart';
我们新引入了三个包,用来做网络请求。dart:convert 用来做数据转换,dart:async 做异步,package:http/http.dart 做请求。接着:
/*接着写*/
class HomePage extends StatefulWidget {
HomePageState createState() => new HomePageState();
}
class HomePageState extends State<HomePage> {
// 获取分类
Future getCategories() async {
final response = await http.get(
'https://gold-tag-ms.juejin.im/v1/categories',
headers: httpHeaders);
if (response.statusCode == 200) {
return json.decode(response.body);
} else {
throw Exception('Failed to load categories');
}
}
Widget build(BuildContext context) {
// TODO: implement build
return FutureBuilder(
future: getCategories(),
builder: (context, snapshot) {
if (snapshot.hasData) {
var tabList = snapshot.data['d']['categoryList'];
return new CreatePage(
tabList: tabList,
);
} else if (snapshot.hasError) {
return Text("error1>>>>>>>>>>>>>>>:${snapshot.error}");
}
return new Container(
color: new Color.fromRGBO(244, 245, 245, 1.0),
);
},
);
}
}
这部分我们先获取获取掘金顶部的分类列表,Future 类似于 Promise ,用来做异步请求, FutureBuilder 函数用来在请求返回后构建页面,返回的状态、数据等信息都在 snapshot 中(前端的同志们看到 async 和 await 是不是很眼熟?)。这里我们把构建页面的代码提取出来,不然嵌套太多让人崩溃,并把获取的tabs传下去。我这里用的 FutureBuilder,小伙伴们也可以用文档中的写法,看上去还会更简洁,不过既然是学习嘛,写写也无妨。
/*接着写*/
//创建页面
class CreatePage extends StatefulWidget {
final List tabList;
CreatePage({Key key, this.tabList}) : super(key: key);
CreatePageState createState() => new CreatePageState();
}
class CreatePageState extends State<CreatePage>
with SingleTickerProviderStateMixin {
Widget build(BuildContext context) {
//TODO: implement build
return new DefaultTabController(
length: widget.tabList.length,
child: new Scaffold(
appBar: new AppBar(
backgroundColor: new Color.fromRGBO(244, 245, 245, 1.0),
automaticallyImplyLeading: false,
titleSpacing: 0.0,
title: new TabBar(
indicatorSize: TabBarIndicatorSize.label,
isScrollable: true,
labelColor: Colors.blue,
unselectedLabelColor: Colors.grey,
tabs: widget.tabList.map((tab) {
return new Tab(
text: tab['name'],
);
}).toList()),
actions: <Widget>[
new IconButton(
icon: new Icon(
Icons.add,
color: Colors.blue,
),
onPressed: () {
Navigator.pushNamed(context, '/shareArticle');
})
],
),
body: new TabBarView(
children: widget.tabList.map((cate) {
return ArticleLists(
categories: cate,
);
}).toList()),
));
}
}
这部分用于创建tab选项和tab页面,DefaultTabController 是创建 tabBarView 的一个简单组件,以后小伙伴们可以自己实现个性化的 tabBarView ,action 里我已经把路由写进去了,等我们把页面写完,再去实现路由。我们把构建文章列表的代码也提出来,当每点击一个tab,就把对应的tab信息传入,查询文章会需要tab项中的 id。
/*接着写*/
class ArticleLists extends StatefulWidget {
final Map categories;
ArticleLists({Key key, this.categories}) : super(key: key);
ArticleListsState createState() => new ArticleListsState();
}
class ArticleListsState extends State<ArticleLists> {
List articleList;
Future getArticles({int limit = 20, String category}) async {
final String url =
'https://timeline-merger-ms.juejin.im/v1/get_entry_by_rank?src=${httpHeaders['X-Juejin-Src']}&uid=${httpHeaders['X-Juejin-Uid']}&device_id=${httpHeaders['X-Juejin-Client']}&token=${httpHeaders['X-Juejin-Token']}&limit=$limit&category=$category';
final response = await http.get(Uri.encodeFull(url));
if (response.statusCode == 200) {
return json.decode(response.body);
} else {
throw Exception('Failed to load post');
}
}
Widget build(BuildContext context) {
// TODO: implement build
return new FutureBuilder(
future: getArticles(category: widget.categories['id']),
builder: (context, snapshot) {
if (snapshot.hasData) {
articleList = snapshot.data['d']['entrylist'];
return new ListView.builder(
itemCount: articleList.length,
itemBuilder: (context, index) {
var item = articleList[index];
return createItem(item);
});
} else if (snapshot.hasError) {
return new Center(
child: new Text("error2>>>>>>>>>>>>>>>:${snapshot.error}"),
);
}
return new CupertinoActivityIndicator();
});
}
}
我们把单个文章的构建代码也提出来,让代码看着舒服点。
class ArticleListsState extends State<ArticleLists> {
/*接着写*/

//单个文章
  Widget createItem(articleInfo) {
    var objectId = articleInfo['originalUrl']
        .substring(articleInfo['originalUrl'].lastIndexOf('/') + 1);
    var tags = articleInfo['tags'];
    return new Container(
      margin: new EdgeInsets.only(bottom: 10.0),
      padding: new EdgeInsets.only(top: 10.0, bottom: 10.0),
      child: new FlatButton(
        padding: new EdgeInsets.all(0.0),
        onPressed: () {
          Navigator.push(
              context,
              new CupertinoPageRoute(
                  builder: (context) => ArticleDetail(
                        objectId: objectId,
                        articleInfo: articleInfo,
                      )));
        },
        child: new Column(
          children: <Widget>[
            new Row(
              mainAxisAlignment: MainAxisAlignment.spaceBetween,
              children: <Widget>[
                new FlatButton(
                    onPressed: null,
                    child: new Row(
                      children: <Widget>[
                        new CircleAvatar(
                          backgroundImage: new NetworkImage(
                              articleInfo['user']['avatarLarge']),
                        ),
                        new Padding(padding: new EdgeInsets.only(right: 5.0)),
                        new Text(
                          articleInfo['user']['username'],
                          style: new TextStyle(color: Colors.black),
                        )
                      ],
                    )),
                //控制是否显示tag,及显示多少个
                tags.isNotEmpty
                    ? (tags.length >= 2
                        ? new Row(
                            mainAxisAlignment: MainAxisAlignment.end,
                            children: <Widget>[
                              new FlatButton(
                                  onPressed: null,
                                  child: new Text(
                                    tags[0]['title'].toString(),
                                    style: new TextStyle(fontSize: 14.0),
                                  )),
                              new Text('/'),
                              new FlatButton(
                                  onPressed: null,
                                  child: new Text(
                                    tags[1]['title'].toString(),
                                    style: new TextStyle(fontSize: 14.0),
                                  ))
                            ],
                          )
                        : new FlatButton(
                            onPressed: null,
                            child: new Text(
                              tags[0]['title'].toString(),
                              style: new TextStyle(fontSize: 14.0),
                            )))
                    : new Container(
                        width: 0.0,
                        height: 0.0,
                      )
              ],
            ),
            new ListTile(
              title: new Text(articleInfo['title']),
              subtitle: new Text(
                articleInfo['summaryInfo'],
                maxLines: 2,
              ),
            ),
            new Row(
              children: <Widget>[
                new FlatButton(
                    onPressed: null,
                    child: new Row(
                      children: <Widget>[
                        new Icon(Icons.favorite),
                        new Padding(padding: new EdgeInsets.only(right: 5.0)),
                        new Text(articleInfo['collectionCount'].toString())
                      ],
                    )),
                new FlatButton(
                    onPressed: null,
                    child: new Row(
                      children: <Widget>[
                        new Icon(Icons.message),
                        new Padding(padding: new EdgeInsets.only(right: 5.0)),
                        new Text(articleInfo['commentsCount'].toString())
                      ],
                    ))
              ],
            )
          ],
        ),
      ),
      color: Colors.white,
    );
  }
}
每个文章中的交互我这里就不做那么全了,不然篇幅太大,样式小伙伴们也自己调吧,这个花时间。
在单个文章的按钮里我已经写好了跳转函数,就是 onPressed 中的代码,里面用到的 CupertinoPageRoute 主要是 iOS 风格的滑动动画,我们来实现详情页。
实现文章详情页
在 pages 文件夹下新建 articleDetail.dart 文件,flutter目前还不支持渲染 html ,因此我们这里需要引入一个插件 flutter_html_view,这个插件支持的标签也不是很多,但目前差不多够用了,为作者点个赞。打开 pubspec.yaml 文件,在 dependencies 下写入依赖:
dependencies:
  flutter:
    sdk: flutter

  # The following adds the Cupertino Icons font to your application.
  # Use with the CupertinoIcons class for iOS style icons.
  cupertino_icons: ^0.1.2
  flutter_html_view: "^0.5.1"
然后在 articleDetail.dart 顶部引入:
import 'package:flutter/material.dart';
import 'package:flutter/cupertino.dart';
import 'dart:convert';
import 'dart:async';
import 'package:http/http.dart' as http;
import '../config/httpHeaders.dart';
import 'package:flutter_html_view/flutter_html_view.dart';
接着就是写页面了:
class ArticleDetail extends StatefulWidget {
final String objectId;
final Map articleInfo;
ArticleDetail({Key key, this.objectId, this.articleInfo}) : super(key: key);
ArticleDetailState createState() => new ArticleDetailState();
}
class ArticleDetailState extends State<ArticleDetail> {
Future getContent() async {
final String url =
'https://post-storage-api-ms.juejin.im/v1/getDetailData?uid=${httpHeaders['X-Juejin-Src']}&device_id=${httpHeaders['X-Juejin-Client']}&token=${httpHeaders['X-Juejin-Token']}&src=${httpHeaders['X-Juejin-Src']}&type=entryView&postId=${widget
.objectId}';
final response = await http.get(Uri.encodeFull(url));
if (response.statusCode == 200) {
return json.decode(response.body)['d'];
} else {
throw Exception('Failed to load content');
}
}
Widget build(BuildContext context) {
// TODO: implement build
var articleInfo = widget.articleInfo;
return new FutureBuilder(
future: getContent(),
builder: (context, snapshot) {
if (snapshot.hasData) {
var content = snapshot.data['content'];
return new Scaffold(
appBar: new AppBar(
backgroundColor: new Color.fromRGBO(244, 245, 245, 1.0),
leading: new IconButton(
padding: new EdgeInsets.all(0.0),
icon: new Icon(
Icons.chevron_left,
),
onPressed: () {
Navigator.pop(context);
}),
title: new Row(
children: <Widget>[
new CircleAvatar(
backgroundImage: new NetworkImage(
articleInfo['user']['avatarLarge']),
),
new Padding(padding: new EdgeInsets.only(right: 5.0)),
new Text(articleInfo['user']['username'])
],
),
actions: <Widget>[
new IconButton(
icon: new Icon(
Icons.file_upload,
color: Colors.blue,
),
onPressed: null)
],
),
bottomNavigationBar: new Container(
height: 50.0,
padding: new EdgeInsets.only(left: 10.0, right: 10.0),
decoration: new BoxDecoration(
color: new Color.fromRGBO(244, 245, 245, 1.0),
border: new Border(
top: new BorderSide(width: 0.2, color: Colors.grey))),
child: new Row(
mainAxisAlignment: MainAxisAlignment.spaceBetween,
crossAxisAlignment: CrossAxisAlignment.center,
children: <Widget>[
new Row(
children: <Widget>[
new Icon(
Icons.favorite_border,
color: Colors.green,
size: 24.0,
),
new Padding(
padding: new EdgeInsets.only(right: 20.0)),
new Icon(
Icons.message,
color: Colors.grey,
size: 24.0,
),
new Padding(
padding: new EdgeInsets.only(right: 20.0)),
new Icon(
Icons.playlist_add,
color: Colors.grey,
size: 24.0,
)
],
),
new Text(
'喜欢 ${articleInfo['collectionCount']} · 评论 ${articleInfo['commentsCount']}')
],
),
),
);
} else if (snapshot.hasError) {
return new Container(
color: Colors.white,
child: new Text("error2>>>>>>>>>>>>>>>:${snapshot.error}"),
);
}
return new Container(
color: new Color.fromRGBO(244, 245, 245, 1.0),
child: new CupertinoActivityIndicator(),
);
});
}
}
将 html 写入页面的就是下面这段代码:
 body: new ListView(
          children: <Widget>[
            new Container(
                color: Colors.white,
                child: new HtmlView(
                  data: content,
                ))
          ],
    )
细心的小伙伴会发现,bottomNavigationBar 中传入的是一个有高度的 Container ,这个很重要,flutter中的组件其实是很灵活的,不要被官网提供的组件限制了,只要满足条件(比如 bottomNavigationBar 必须传入 PreferredSizeWidget),各种各样的自定义组件都可以用。
点赞、评论啥的我们先不做,用过掘金app的小伙伴都知道,这些功能是需要登录后才能用的,所以我们放到后面来实现。
实现发现页
打开 discovery.dart ,可以删掉之前写的代码,或者在原来的基础上改造也可以,看大家喜欢,首先在顶部引入需要用的包和其他文件:
import 'package:flutter/material.dart';
import 'package:flutter/cupertino.dart';
import 'dart:async';
import 'dart:convert';
import 'package:http/http.dart' as http;
import '../utils/countTime.dart';
import '../config/httpHeaders.dart';
在这里我引入了一个 countTime.dart 文件,这个是我们用来计算文章发布时间与当前的差值的,我们先把这个小工具实现一下。在 lib 文件夹下新建 utils 文件夹,并在其中新建 countTime.dart 文件,写入以下代码:
//计算发布时间间隔
String countTime(String timestamp) {
  var now = new DateTime.now();
  var publicTime = DateTime.parse(timestamp);
  var diff = now.difference(publicTime);
  if (diff.inDays > 0) {
    return '${diff.inDays}天前';
  } else if (diff.inHours > 0) {
    return '${diff.inHours}小时前';
  } else if (diff.inMinutes > 0) {
    return '${diff.inMinutes}分钟前';
  } else if (diff.inSeconds > 0) {
    return '${diff.inSeconds}秒前';
  }
  return timestamp.substring(0, timestamp.indexOf('T'));
}
上面的代码通过传入的时间戳来计算差值,并返回不同的文本,比较简单,只要小伙伴们熟悉一下语法就会了。
回到 discovery.dart 继续我们的代码,将上一篇文章中网络请求的写法改一下:
/*接着写*/
class DiscoveryPage extends StatefulWidget {
DiscoveryPageState createState() => new DiscoveryPageState();
}
class DiscoveryPageState extends State<DiscoveryPage> {
List hotArticles;
Future getHotArticles() {
return http.get(Uri.encodeFull(
'https://timeline-merger-ms.juejin.im/v1/get_entry_by_rank?src=${httpHeaders['X-Juejin-Src']}&uid=${httpHeaders['X-Juejin-Uid']}&device_id=${httpHeaders['X-Juejin-Client']}&token=${httpHeaders['X-Juejin-Token']}&limit=20&category=all&recomment=1'));
}
void initState() {
super.initState();
this.getHotArticles().then((response) {
setState(() {
hotArticles = json.decode(response.body)['d']['entrylist'];
});
}, onError: (e) {
throw Exception('Failed to load data');
});
}
}
initState 用来做初始化,写过 react 的同志应该很熟悉了。接着是 then ,是不是和 Promise 很像?
之前我们构建页面用的主要是 ListView ,既然是入门教程,我们今天就用新的组件,多熟悉一些东西。接着写:
class DiscoveryPageState extends State<DiscoveryPage> {
/*接着写*/
Widget build(BuildContext context) {
// TODO: implement build
return CustomScrollView(
slivers: <Widget>[
new SliverAppBar(
pinned: true,
title: new Card(
color: new Color.fromRGBO(250, 250, 250, 0.6),
child: new FlatButton(
onPressed: () {
Navigator.pushNamed(context, '/search');
},
child: new Row(
mainAxisAlignment: MainAxisAlignment.center,
crossAxisAlignment: CrossAxisAlignment.center,
children: <Widget>[
new Icon(
Icons.search,
color: Colors.black,
),
new Padding(padding: new EdgeInsets.only(right: 5.0)),
new Text('搜索')
],
),
)),
titleSpacing: 5.0,
backgroundColor: new Color.fromRGBO(244, 245, 245, 1.0),
),
new SliverList(
delegate: new SliverChildBuilderDelegate((context, index) {
return new Container(
color: Colors.white,
padding: new EdgeInsets.only(top: 15.0,bottom: 15.0),
margin: new EdgeInsets.only(bottom: 20.0),
child: new Row(
mainAxisAlignment: MainAxisAlignment.spaceEvenly,
crossAxisAlignment: CrossAxisAlignment.center,
children: <Widget>[
new FlatButton(
onPressed: null,
child: new Column(
children: <Widget>[
new Icon(
Icons.whatshot,
color: Colors.red,
size: 30.0,
),
new Text('本周最热')
],
)),
new FlatButton(
onPressed: null,
child: new Column(
children: <Widget>[
new Icon(
Icons.collections,
color: Colors.green,
size: 30.0,
),
new Text('收藏集')
],
)),
new FlatButton(
onPressed: () {
Navigator.pushNamed(context, '/activities');
},
child: new Column(
children: <Widget>[
new Icon(
Icons.toys,
color: Colors.yellow,
size: 30.0,
),
new Text('活动')
],
)),
],
),
);
}, childCount: 1)),
new SliverList(
delegate: new SliverChildBuilderDelegate((context, index) {
return new Container(
padding: new EdgeInsets.all(10.0),
decoration: new BoxDecoration(
border: new Border(
bottom: new BorderSide(width: 0.2, color: Colors.grey)),
color: Colors.white),
child: new Row(
mainAxisAlignment: MainAxisAlignment.spaceBetween,
crossAxisAlignment: CrossAxisAlignment.center,
children: <Widget>[
new Row(
mainAxisAlignment: MainAxisAlignment.start,
crossAxisAlignment: CrossAxisAlignment.center,
children: <Widget>[
new Icon(
Icons.whatshot,
color: Colors.red,
),
new Padding(padding: new EdgeInsets.only(right: 5.0)),
new Text(
'热门文章',
style: new TextStyle(fontSize: 14.0),
)
],
),
new Row(
children: <Widget>[
new Icon(
Icons.settings,
color: Colors.grey,
),
new Padding(padding: new EdgeInsets.only(right: 5.0)),
new Text(
'定制热门',
style: new TextStyle(fontSize: 14.0, color: Colors.grey),
)
],
)
],
),
);
}, childCount: 1)),
new SliverFixedExtentList(
itemExtent: 100.0,
delegate: new SliverChildBuilderDelegate((context, index) {
var itemInfo = hotArticles[index];
return createItem(itemInfo);
}, childCount: hotArticles == null ? 0 : hotArticles.length)),
],
);
}
}
这里我们用的 CustomScrollView 和 Sliver,语法啥的小伙伴们自己看文档了哈,就不解释了。对于搜索按钮和活动按钮,我这里已经写了跳转路由,不急,我们一会儿就去实现。我们把单个文章的构建代码提出来,让整体简洁一点。
class DiscoveryPageState extends State<DiscoveryPage> {
  /*接着写*/
  //单个热门文章
    Widget createItem(itemInfo) {
      var publicTime = countTime(itemInfo['createdAt']);
      return new Container(
        padding: new EdgeInsets.only(top: 10.0, bottom: 10.0),
        decoration: new BoxDecoration(
            color: Colors.white,
            border: new Border(
                bottom: new BorderSide(width: 0.2, color: Colors.grey))),
        child: new FlatButton(
            onPressed: null,
            child: new Row(
              mainAxisAlignment: MainAxisAlignment.spaceBetween,
              crossAxisAlignment: CrossAxisAlignment.center,
              children: <Widget>[
                new Expanded(
                  child: new Column(
                    crossAxisAlignment: CrossAxisAlignment.start,
                    children: <Widget>[
                      new Text(
                        itemInfo['title'],
                        textAlign: TextAlign.left,
                        style: new TextStyle(
                          color: Colors.black,
                        ),
                        maxLines: 2,
                        overflow: TextOverflow.ellipsis,
                      ),
                      new Text(
                        '${itemInfo['collectionCount']}人喜欢 · ${itemInfo['user']['username']} · $publicTime',
                        textAlign: TextAlign.left,
                        style: new TextStyle(color: Colors.grey, fontSize: 12.0),
                        softWrap: true,
                      )
                    ],
                  ),
                ),
                itemInfo['screenshot'] != null
                    ? new Image.network(
                        itemInfo['screenshot'],
                        width: 100.0,
                      )
                    : new Container(
                        width: 0.0,
                        height: 0.0,
                      )
              ],
            )),
      );
    }
}
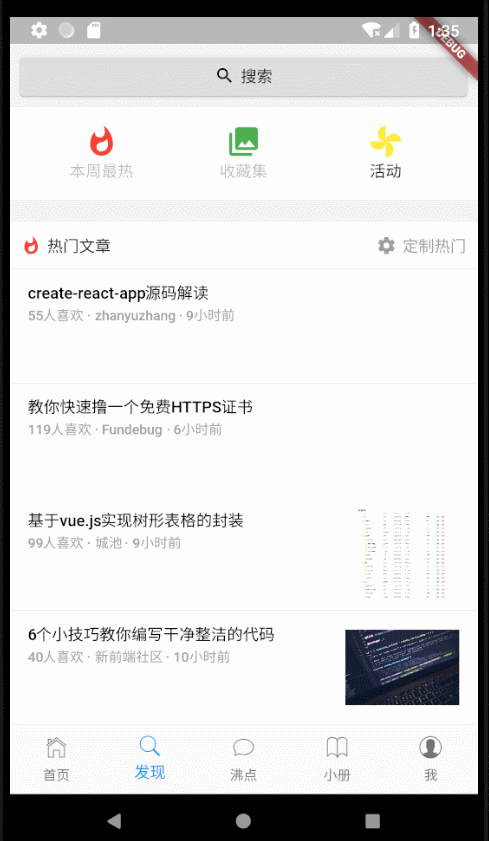
这里的单个文章有可能没有截图,所以写个判断。现在运行一下,如果你看到的界面长这样,就 OK 了:

实现搜索页
我们先实现搜索页,在 pages 下新建 search.dart ,写入下列代码:
import 'package:flutter/material.dart';
import 'package:flutter/cupertino.dart';
import 'package:http/http.dart' as http;
import 'dart:convert';
import 'dart:async';
import '../utils/countTime.dart';
class SearchPage extends StatefulWidget {
SearchPageState createState() => new SearchPageState();
}
class SearchPageState extends State<SearchPage> {
String searchContent;
List searchResult;
Future search(String query) {
return http.get(
'https://search-merger-ms.juejin.im/v1/search?query=$query&page=0&raw_result=false&src=web');
}
final TextEditingController controller = new TextEditingController();
}
这里我们申明两个变量 searchContent 和 searchResult ,前者是搜索内容,后者是结果列表,再申明一个 controller 用于控制输入框。
接着构建页面:
class SearchPageState extends State<SearchPage> {
/*接着写*/
Widget build(BuildContext context) {
// TODO: implement build
return new CustomScrollView(
slivers: <Widget>[
new SliverAppBar(
pinned: true,
leading: new IconButton(
icon: new Icon(Icons.chevron_left),
onPressed: () {
Navigator.pop(context);
}),
title: new Text(
'搜索',
style: new TextStyle(fontWeight: FontWeight.normal),
),
centerTitle: true,
iconTheme: new IconThemeData(color: Colors.blue),
backgroundColor: new Color.fromRGBO(244, 245, 245, 1.0),
bottom: new PreferredSize(
child: new Container(
color: Colors.white,
padding: new EdgeInsets.all(5.0),
child: new Card(
color: new Color.fromRGBO(252, 252, 252, 0.6),
child: new Padding(
padding: new EdgeInsets.all(5.0),
child: new Row(
crossAxisAlignment: CrossAxisAlignment.center,
mainAxisAlignment: MainAxisAlignment.spaceBetween,
children: <Widget>[
new Expanded(
child: new TextField(
autofocus: true,
style: new TextStyle(
fontSize: 14.0, color: Colors.black),
decoration: new InputDecoration(
contentPadding: new EdgeInsets.all(0.0),
border: InputBorder.none,
hintText: '搜索',
prefixIcon: new Icon(
Icons.search,
size: 16.0,
color: Colors.grey,
),
),
onChanged: (String content) {
setState(() {
searchContent = content;
});
},
onSubmitted: (String content) {
search(content).then((response) {
setState(() {
searchResult =
json.decode(response.body)['d'];
});
}, onError: (e) {
throw Exception('Failed to load data');
});
},
controller: controller,
),
),
searchContent == ''
? new Container(
height: 0.0,
width: 0.0,
)
: new InkResponse(
child: new Icon(
Icons.close,
),
onTap: () {
setState(() {
searchContent = '';
controller.text = '';
});
})
],
),
)),
),
preferredSize: new Size.fromHeight(40.0))),
searchResult == null
? new SliverFillRemaining(
child: new Container(
color: Colors.white,
),
)
: new SliverList(
delegate: new SliverChildBuilderDelegate((context, index) {
var resultInfo = searchResult[index];
return showResult(resultInfo);
}, childCount: searchResult.length))
],
);
}
}
这里没什么特别的,小伙伴们看看代码就懂了,我们还是把搜索结果单独提出来:
class SearchPageState extends State<SearchPage> {
/*接着写*/
//显示搜索结果
  Widget showResult(resultInfo) {
    var publicTime = countTime(resultInfo['createdAt']);
    return new Container(
      alignment: Alignment.centerLeft,
      padding: new EdgeInsets.all(10.0),
      decoration: new BoxDecoration(
          color: Colors.white,
          border: new Border(
              bottom: new BorderSide(width: 0.2, color: Colors.grey))),
      child: new FlatButton(
          onPressed: null,
          child: new Column(
            crossAxisAlignment: CrossAxisAlignment.start,
            mainAxisAlignment: MainAxisAlignment.start,
            children: <Widget>[
              new Text(
                resultInfo['title'],
                style: new TextStyle(color: Colors.black),
              ),
              new Text(
                '${resultInfo['collectionCount']}人喜欢 · ${resultInfo['user']['username']} · $publicTime',
                textAlign: TextAlign.left,
                style: new TextStyle(color: Colors.grey, fontSize: 12.0),
                softWrap: true,
              )
            ],
          )),
    );
  }
}
至此,搜索页面写完了,别忙运行啊,还没写路由呢。打开 main.dart,引入 search.dart,然后配置一下路由:
import 'package:flutter/material.dart';
import 'pages/index.dart';
import 'pages/search.dart';
void main() => runApp(new MyApp());
class MyApp extends StatelessWidget {
Widget build(BuildContext context) {
return new MaterialApp(
home: new IndexPage(),
theme: new ThemeData(
highlightColor: Colors.transparent,
//将点击高亮色设为透明
splashColor: Colors.transparent,
//将喷溅颜色设为透明
bottomAppBarColor: new Color.fromRGBO(244, 245, 245, 1.0),
//设置底部导航的背景色
scaffoldBackgroundColor: new Color.fromRGBO(244, 245, 245, 1.0),
//设置页面背景颜色
primaryIconTheme: new IconThemeData(color: Colors.blue),
//主要icon样式,如头部返回icon按钮
indicatorColor: Colors.blue,
//设置tab指示器颜色
iconTheme: new IconThemeData(size: 18.0),
//设置icon样式
primaryTextTheme: new TextTheme(
//设置文本样式
title: new TextStyle(color: Colors.black, fontSize: 16.0))),
routes: <String, WidgetBuilder>{
'/search': (BuildContext context) => SearchPage()
},
);
}
}
现在可以运行了,效果如下:点击进入搜索详情页我就不做了,这些都留给小伙伴们练手吧:
实现活动页
活动页的实现和首页一模一样,代码我就不贴了,在 main.dart 配置一下就行:
import 'package:flutter/material.dart';
import 'pages/index.dart';
import 'pages/search.dart';
import 'pages/activities.dart';
void main() => runApp(new MyApp());
class MyApp extends StatelessWidget {
Widget build(BuildContext context) {
return new MaterialApp(
home: new IndexPage(),
theme: new ThemeData(
highlightColor: Colors.transparent,
//将点击高亮色设为透明
splashColor: Colors.transparent,
//将喷溅颜色设为透明
bottomAppBarColor: new Color.fromRGBO(244, 245, 245, 1.0),
//设置底部导航的背景色
scaffoldBackgroundColor: new Color.fromRGBO(244, 245, 245, 1.0),
//设置页面背景颜色
primaryIconTheme: new IconThemeData(color: Colors.blue),
//主要icon样式,如头部返回icon按钮
indicatorColor: Colors.blue,
//设置tab指示器颜色
iconTheme: new IconThemeData(size: 18.0),
//设置icon样式
primaryTextTheme: new TextTheme(
//设置文本样式
title: new TextStyle(color: Colors.black, fontSize: 16.0))),
routes: <String, WidgetBuilder>{
'/search': (BuildContext context) => SearchPage(),
'/activities': (BuildContext context) => ActivitiesPage(),
},
);
}
}
效果如下:
引入 Redux
写过 react 的小伙伴对 redux 一定不陌生,我们这里引入 flutter_redux 这个插件来管理登录状态,它是国外的牛人写的,小伙伴们之后自己了解吧,这里为作者点个赞。
打开 pubspec.yaml 写入依赖,并 get 一下:
dependencies:
  flutter_redux: ^0.5.2
然后打开 main.dart ,引入 redux :
import 'package:flutter_redux/flutter_redux.dart';
import 'package:redux/redux.dart';
接着,我们在 lib 下新建 reducers 文件夹,并在其中新建 reducers.dart ,写入下列代码:
Map getUserInfo(Map userInfo, dynamic action) {
  if (action.type == 'SETUSERINFO') {
    userInfo = action.userInfo;
  } else if (action.type == 'GETUSERINFO') {}
  print(action.type);
  return userInfo;
}
接着在 lib 下新建 actions 文件夹,并在其中新建 actions.dart ,写入下列代码:
class UserInfo {
  String type;
  final Map userInfo;

  UserInfo(this.type,this.userInfo);
}
小伙伴们一看就知道就是做获取用户信息及修改用户信息的,就不多做解释。
回到 main.dart ,引入 actions 和 reducers 并改造之前的代码:
import 'actions/actions.dart';
import 'reducers/reducers.dart';
void main() {
final userInfo = new Store<Map>(getUserInfo, initialState: {});
runApp(new MyApp(
store: userInfo,
));
}
class MyApp extends StatelessWidget {
final Store<Map> store;
MyApp({Key key, this.store}) : super(key: key);
Widget build(BuildContext context) {
return new StoreProvider(
store: store,
child: new MaterialApp(
home: new IndexPage(),
theme: new ThemeData(
highlightColor: Colors.transparent,
//将点击高亮色设为透明
splashColor: Colors.transparent,
//将喷溅颜色设为透明
bottomAppBarColor: new Color.fromRGBO(244, 245, 245, 1.0),
//设置底部导航的背景色
scaffoldBackgroundColor: new Color.fromRGBO(244, 245, 245, 1.0),
//设置页面背景颜色
primaryIconTheme: new IconThemeData(color: Colors.blue),
//主要icon样式,如头部返回icon按钮
indicatorColor: Colors.blue,
//设置tab指示器颜色
iconTheme: new IconThemeData(size: 18.0),
//设置icon样式
primaryTextTheme: new TextTheme(
//设置文本样式
title: new TextStyle(color: Colors.black, fontSize: 16.0))),
routes: <String, WidgetBuilder>{
'/search': (BuildContext context) => SearchPage(),
'/activities': (BuildContext context) => ActivitiesPage(),
},
));
}
}
我们用 StoreProvider 将根组件 MaterialApp 包裹起来,因为其他页面都是在根组件下的,所以其他所有页面都能获取到 store 。到此我们就算是引入 redux 了。
实现登录页
我们这里做的是用户登录状态的管理,所以我们先实现登录页。
在 pages 下新建 signin.dart ,先引入所需要的东西:
import 'package:flutter/material.dart';
import 'package:flutter/cupertino.dart';
import 'dart:convert';
import 'package:http/http.dart' as http;
import 'package:flutter_redux/flutter_redux.dart';
import 'package:redux/redux.dart';
import '../actions/actions.dart';
import '../reducers/reducers.dart';
接着,我们先定义一下变量啥的,后面会用到:
/*接着写*/
class SignInPage extends StatefulWidget {
SignInPageState createState() => new SignInPageState();
}
class SignInPageState extends State<SignInPage> {
String account; //账号
String password; //密码
Map userInfo; //用户信息
List signMethods = [ //其他登录方式
'lib/assets/icon/weibo.png',
'lib/assets/icon/wechat.png',
'lib/assets/icon/github.png'
];
RegExp phoneNumber = new RegExp(
r"(0|86|17951)?(13[0-9]|15[0-35-9]|17[0678]|18[0-9]|14[57])[0-9]{8}"); //验证手机正则表达式
final TextEditingController accountController = new TextEditingController();
final TextEditingController passwordController = new TextEditingController();
//显示提示信息
void showAlert(String value) {
showDialog(
context: context,
builder: (context) {
return new AlertDialog(
content: new Text(value),
);
});
}
}
这里只需注意两个 controller ,因为我这里用的是 TextField ,所以需要它们俩来对输入框做一些控制。当然,小伙伴们也可以用 TextForm。
class SignInPageState extends State<SignInPage> {
/*接着写*/
Widget build(BuildContext context) {
// TODO: implement build
return new Scaffold(
appBar: new AppBar(
backgroundColor: new Color.fromRGBO(244, 245, 245, 1.0),
titleSpacing: 0.0,
leading: new IconButton(
icon: new Icon(Icons.chevron_left),
onPressed: (() {
Navigator.pop(context);
})),
),
body: new Container(
child: new Column(
crossAxisAlignment: CrossAxisAlignment.center,
mainAxisAlignment: MainAxisAlignment.spaceBetween,
children: <Widget>[
new Container(
child: new Column(
children: <Widget>[
new Container(
height: 80.0,
margin: new EdgeInsets.only(top: 30.0, bottom: 30.0),
child: new ClipRRect(
borderRadius: new BorderRadius.circular(15.0),
child: new Image.asset(
'lib/assets/img/juejin.jpg',
),
)),
new Container(
decoration: new BoxDecoration(
border: new Border(
top: new BorderSide(
width: 0.5, color: Colors.grey),
bottom: new BorderSide(
width: 0.5, color: Colors.grey))),
margin: new EdgeInsets.only(bottom: 20.0),
child: new Column(
children: <Widget>[
new TextField(
decoration: new InputDecoration(
hintText: '邮箱/手机',
border: new UnderlineInputBorder(
borderSide: new BorderSide(
color: Colors.grey, width: 0.2)),
prefixIcon: new Padding(
padding: new EdgeInsets.only(right: 20.0))),
controller: accountController,
onChanged: (String content) {
setState(() {
account = content;
});
},
),
new TextField(
decoration: new InputDecoration(
border: InputBorder.none,
hintText: '密码',
prefixIcon: new Padding(
padding: new EdgeInsets.only(right: 20.0))),
controller: passwordController,
onChanged: (String content) {
setState(() {
password = content;
});
},
),
],
),
),
new Container(
padding: new EdgeInsets.only(left: 20.0, right: 20.0),
child: new Column(
children: <Widget>[
  new StoreConnector<Map, VoidCallback>(
       converter: (store) {
         return () => store.dispatch(
             UserInfo('SETUSERINFO', userInfo));
       },
       builder: (context, callback) {
         return new Card(
           color: Colors.blue,
           child: new FlatButton(
               onPressed: () {
                 if (account == null) {
                   showAlert('请输入账号');
                 } else if (password == null) {
                   showAlert('请输入密码');
                 } else if (phoneNumber
                     .hasMatch(account)) {
                   String url =
                       "https://juejin.im/auth/type/phoneNumber";
                   http.post(url, body: {
                     "phoneNumber": account,
                     "password": password
                   }).then((response) {
                     if (response.statusCode == 200) {
                       userInfo =
                           json.decode(response.body);
                       callback();
                       Navigator.pop(context);
                     }
                   });
                 } else {
                   showAlert('请输入正确的手机号码');
                 }
               },
               child: new Row(
                 mainAxisAlignment:
                     MainAxisAlignment.center,
                 children: <Widget>[
                   new Text(
                     '登录',
                     style: new TextStyle(
                         color: Colors.white),
                   )
                 ],
               )),
         );
       },
     ),
new Row(
mainAxisAlignment: MainAxisAlignment.spaceBetween,
children: <Widget>[
new FlatButton(
onPressed: () {},
child: new Text(
'忘记密码?',
style: new TextStyle(color: Colors.grey),
),
),
new FlatButton(
onPressed: () {},
child: new Text(
'注册账号',
style: new TextStyle(color: Colors.blue),
)),
],
)
],
)),
],
),
),
new Container(
child: new Column(
children: <Widget>[
new Text('其他登录方式'),
new Row(
mainAxisAlignment: MainAxisAlignment.spaceEvenly,
children: signMethods.map((item) {
return new IconButton(
icon: new Image.asset(
item,
color: Colors.blue,
),
onPressed: null);
}).toList()),
new Text(
'掘金 · juejin.im',
style: new TextStyle(
color: Colors.grey,
fontSize: 12.0,
),
),
new Row(
mainAxisAlignment: MainAxisAlignment.center,
children: <Widget>[
new Icon(
Icons.check_circle,
color: Colors.grey,
size: 14.0,
),
new Text(
'已阅读并同意',
style:
new TextStyle(color: Colors.grey, fontSize: 12.0),
),
new FlatButton(
onPressed: null,
child: new Text(
'软件许可服务协议',
style: new TextStyle(
decoration: TextDecoration.underline,
decorationColor: const Color(0xff000000),
fontSize: 12.0),
))
],
)
],
),
)
],
),
));
}
}
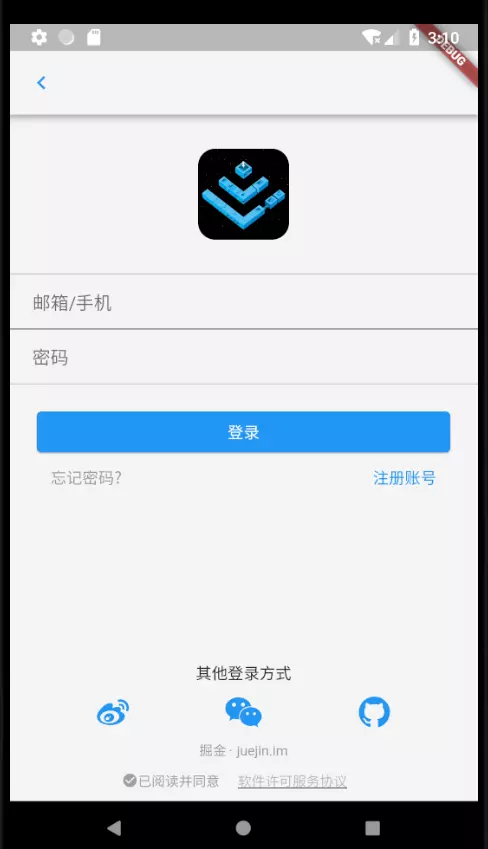
页面长这个样子:
这部分内容稍微有点复杂,嵌套也比较多,我说一下关键点。
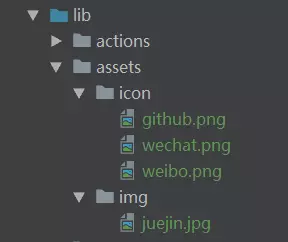
首先是 Image.asset ,这个组件是用来从我们的项目中引入图片,但使用前需要写入依赖。在 lib 下新建一个文件夹用于存放图片:
然后到 pubspec.yaml 下写依赖:
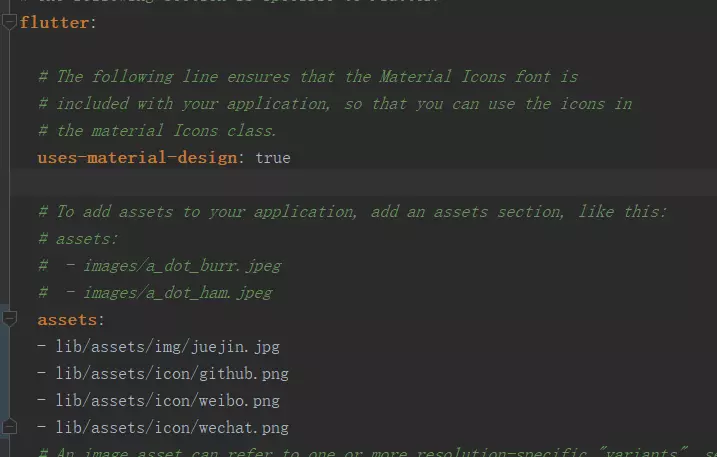
这样才能使用。
其次是在需要和 store 通信的地方用 StoreConnector 将组件包裹起来,我们这里主要是下面这一段:
new StoreConnector<Map, VoidCallback>(
converter: (store) {
return () => store.dispatch(
UserInfo('SETUSERINFO', userInfo));
},
builder: (context, callback) {
return new Card(
color: Colors.blue,
child: new FlatButton(
onPressed: () {
if (account == null) {
showAlert('请输入账号');
} else if (password == null) {
showAlert('请输入密码');
} else if (phoneNumber
.hasMatch(account)) {
String url =
"https://juejin.im/auth/type/phoneNumber";
http.post(url, body: {
"phoneNumber": account,
"password": password
}).then((response) {
if (response.statusCode == 200) {
userInfo =
json.decode(response.body);
callback();
Navigator.pop(context);
}
});
} else {
showAlert('请输入正确的手机号码');
}
},
child: new Row(
mainAxisAlignment:
MainAxisAlignment.center,
children: <Widget>[
new Text(
'登录',
style: new TextStyle(
color: Colors.white),
)
],
)),
);
},
),
converter 返回一个函数,内容就是对 store 进行的操作,我们这里是登录,需要把登录信息写入 store ,所以这里是 SETUSERINFO 。这个返回的函数会被 builder 作为第二个参数,我们在调用掘金接口并登录成功后调用此函数将登录信息写入 store 。我这里做的是登录成功后回到之前的页面。
我们回到 main.dart ,添加一下路由:
import 'pages/signin.dart';
/*略过*/
routes: <String, WidgetBuilder>{
        '/search': (BuildContext context) => SearchPage(),
        '/activities': (BuildContext context) => ActivitiesPage(),
        '/signin': (BuildContext context) => SignInPage(),
      },
其实页面写完,登录功能也就可以用了,但是我们得有一个入口进入到登录页面,所以我们接下来实现我的页面。
实现我的页面
打开 mine.dart ,先引入需要的东西并定义一些变量:
import 'package:flutter/material.dart';
import 'package:flutter/cupertino.dart';
import 'package:flutter_redux/flutter_redux.dart';
import 'package:redux/redux.dart';
import '../actions/actions.dart';
import '../reducers/reducers.dart';
class MinePage extends StatefulWidget {
MinePageState createState() => new MinePageState();
}
class MinePageState extends State<MinePage> {
List infoList = [
{
'key': 'msgCenter',
'content': {
'title': '消息中心',
'icon': Icons.notifications,
'color': Colors.blue,
'path': '/msgCenter'
}
},
{
'key': 'collectedEntriesCount',
'content': {
'title': '我喜欢的',
'icon': Icons.favorite,
'color': Colors.green,
'path': '/like'
}
},
{
'key': 'collectionSetCount',
'content': {
'title': '收藏集',
'icon': Icons.collections,
'color': Colors.blue,
'path': '/collections'
}
},
{
'key': 'postedEntriesCount',
'content': {
'title': '已购小册',
'icon': Icons.shop,
'color': Colors.orange,
'path': '/myBooks'
}
},
{
'key': 'collectionSetCount',
'content': {
'title': '我的钱包',
'icon': Icons.account_balance_wallet,
'color': Colors.blue,
'path': '/myWallet'
}
},
{
'key': 'likedPinCount',
'content': {
'title': '赞过的沸点',
'icon': Icons.thumb_up,
'color': Colors.green,
'path': '/pined'
}
},
{
'key': 'viewedEntriesCount',
'content': {
'title': '阅读过的文章',
'icon': Icons.remove_red_eye,
'color': Colors.grey,
'path': '/read'
}
},
{
'key': 'subscribedTagsCount',
'content': {
'title': '标签管理',
'icon': Icons.picture_in_picture,
'color': Colors.grey,
'path': '/tags'
}
},
];
}
这里的 infoList 就是一些选项,提出来写是为了让整体代码看着舒服点。路由我也写在里面了,等之后有空再慢慢完善吧。接着:
class MinePageState extends State<MinePage> {
Widget build(BuildContext context) {
// TODO: implement build
return new StoreConnector<Map, Map>(
converter: (store) => store.state,
builder: (context, info) {
Map userInfo = info;
if (userInfo.isNotEmpty) {
infoList.map((item) {
item['content']['count'] = userInfo['user'][item['key']];
}).toList();
}
return new Scaffold(
appBar: new AppBar(
title: new Text('我'),
centerTitle: true,
backgroundColor: new Color.fromRGBO(244, 245, 245, 1.0),
),
body: new ListView(
children: <Widget>[
new StoreConnector<Map, Map>(
converter: (store) => store.state,
builder: (context, info) {
if(info.isEmpty){}else{}
return new Container(
child: new ListTile(
leading: info.isEmpty?
new CircleAvatar(
child: new Icon(Icons.person, color: Colors.white),
backgroundColor: Colors.grey,
):new CircleAvatar(backgroundImage: new NetworkImage(info['user']['avatarLarge']),),
title: info.isEmpty
? new Text('登录/注册')
: new Text(info['user']['username']),
subtitle: info.isEmpty
? new Container(
width: 0.0,
height: 0.0,
)
: new Text(
'${info['user']['jobTitle']} @ ${info['user']['company']}'),
enabled: true,
trailing: new Icon(Icons.keyboard_arrow_right),
onTap: () {
Navigator.pushNamed(context, '/signin');
},
),
padding: new EdgeInsets.only(top: 15.0, bottom: 15.0),
margin: const EdgeInsets.only(top: 15.0, bottom: 15.0),
decoration: const BoxDecoration(
border: const Border(
top: const BorderSide(
width: 0.2,
color:
const Color.fromRGBO(215, 217, 220, 1.0)),
bottom: const BorderSide(
width: 0.2,
color:
const Color.fromRGBO(215, 217, 220, 1.0)),
),
color: Colors.white),
);
},
),
new Column(
children: infoList.map((item) {
Map itemInfo = item['content'];
return new Container(
decoration: new BoxDecoration(
color: Colors.white,
border: new Border(bottom: new BorderSide(width: 0.2))),
child: new ListTile(
leading: new Icon(
itemInfo['icon'],
color: itemInfo['color'],
),
title: new Text(itemInfo['title']),
trailing: itemInfo['count'] == null
? new Container(
width: 0.0,
height: 0.0,
)
: new Text(itemInfo['count'].toString()),
onTap: () {
Navigator.pushNamed(context, itemInfo['path']);
},
),
);
}).toList()),
new Column(
children: <Widget>[
new Container(
margin: new EdgeInsets.only(top: 15.0),
decoration: new BoxDecoration(
color: Colors.white,
border: new Border(
top: new BorderSide(width: 0.2),
bottom: new BorderSide(width: 0.2))),
child: new ListTile(
leading: new Icon(Icons.insert_drive_file),
title: new Text('意见反馈'),
),
),
new Container(
margin: new EdgeInsets.only(bottom: 15.0),
decoration: new BoxDecoration(
color: Colors.white,
border:
new Border(bottom: new BorderSide(width: 0.2))),
child: new ListTile(
leading: new Icon(Icons.settings),
title: new Text('设置'),
),
),
],
),
],
),
);
});
}
}
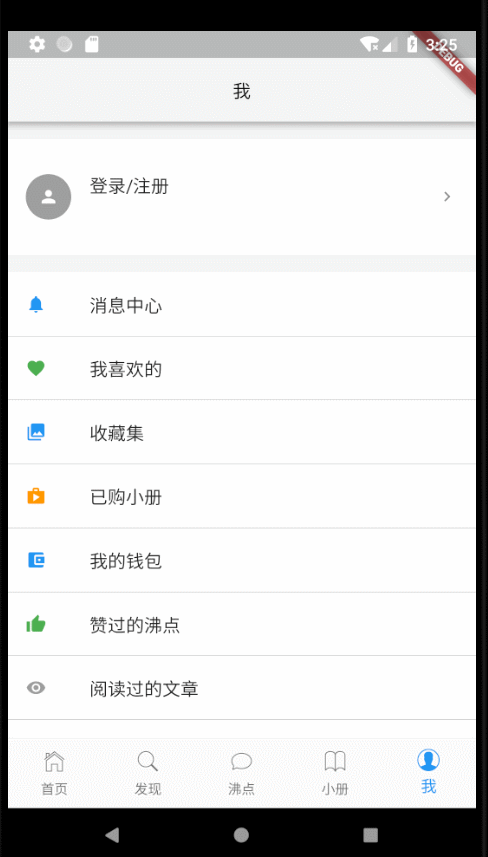
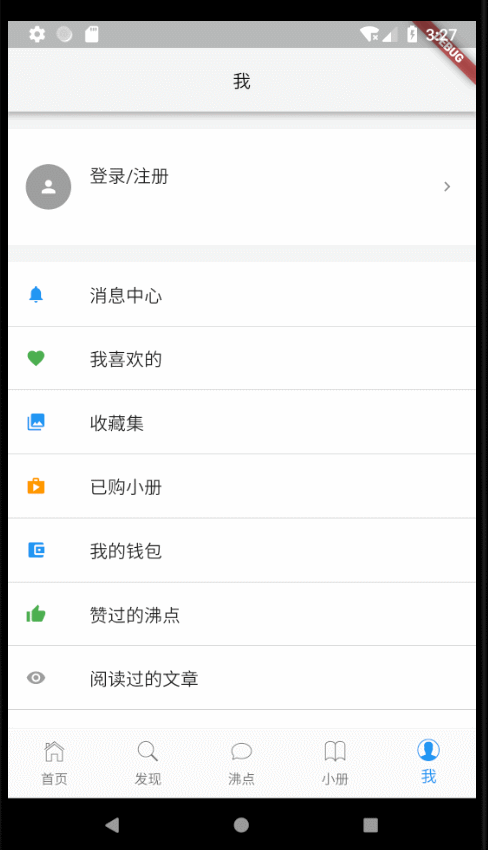
这里也是一样,因为我们整个页面都会用到 store ,所以我们在最外层使用 StoreConnector ,代码中有很多三元表达式,这个是为了在是否有登陆信息两种状态下显示不同内容的,完成后的页面长这个样子:
为什么显示的是登录/注册呢?因为我们没登录啊,哈哈!放一张完成后的联动图:
小伙伴们可以看到,登录后会显示用户的一些信息,细心的小伙伴会发现输入账号密码的时候会提示超出了,我个人觉得这个应该是正常的吧,毕竟底部键盘弹起来肯定会遮挡部分页面。其他需要用到登录状态的地方也是一样的写法。
结语
至此,此入门教程就完结了。由于文章篇幅,沸点和小册两个 tab 页面我就不贴了,相信如果是从第一篇文章看到现在的小伙伴都会写了。
总结一下我们学习的东西,主要涉及的知识点如下:
- 基础组件的使用
- 网络请求
- 路由配置及传参
html代码的渲染- 使用
redux做状态管理
总结完了感觉没多少东西,不过我也是初学者,水平有限,文中的不足及错误还请指出,一起学习、交流。之后的话项目我会不时更新,不过是在 GitHub 上以代码的形式了,喜欢的小伙伴可以关注一下。源码点这里。